Arduino 101
Introduction to Microprocessors
Nick Borko
September 21, 2013

Except where otherwise noted, this work is licensed under
http://creativecommons.org/licenses/by-nc-sa/3.0
Agenda
- Introduction
- What is a microprocessor?
- What's so great about the Arduino?
- History of the Arduino
- Overview of the Arduino hardware
- Overview of the Arduino IDE
- Overview of Arduino programming
- Hands on: Oooh, Blinky!
What is a Microprocessor?
There are 5 basic functions units of a computer system:
- Control Unit (CU)
- Arithmetic-Logical-Unit (ALU)
- Memory (ROM, RAM, Registers)
- Input
- Output
What is a Microprocessor?

What is a Microprocessor?
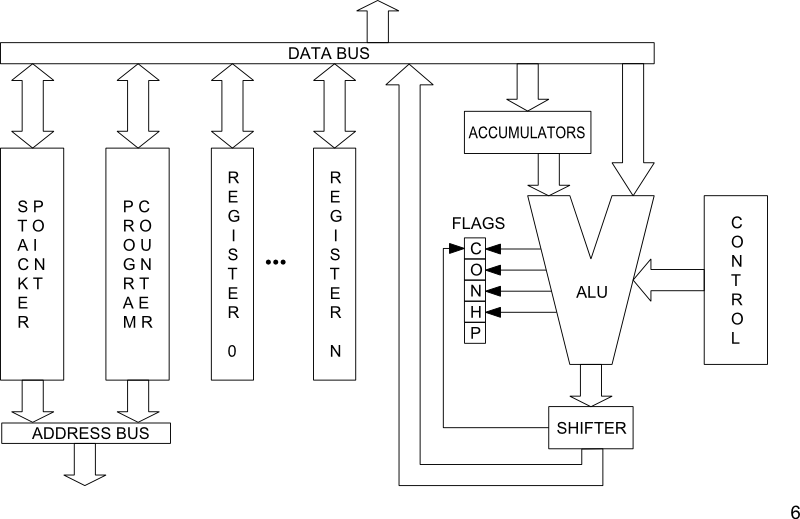
- The classical definition of a microprocessor is the combination of the Control Unit, Arithmetical-Logical-Unit and Registers in a single package, a.k.a. CPU
- Modern microprocessors also integrate input and output ports and on-chip memory (cache, EEPROM, flash, RAM)
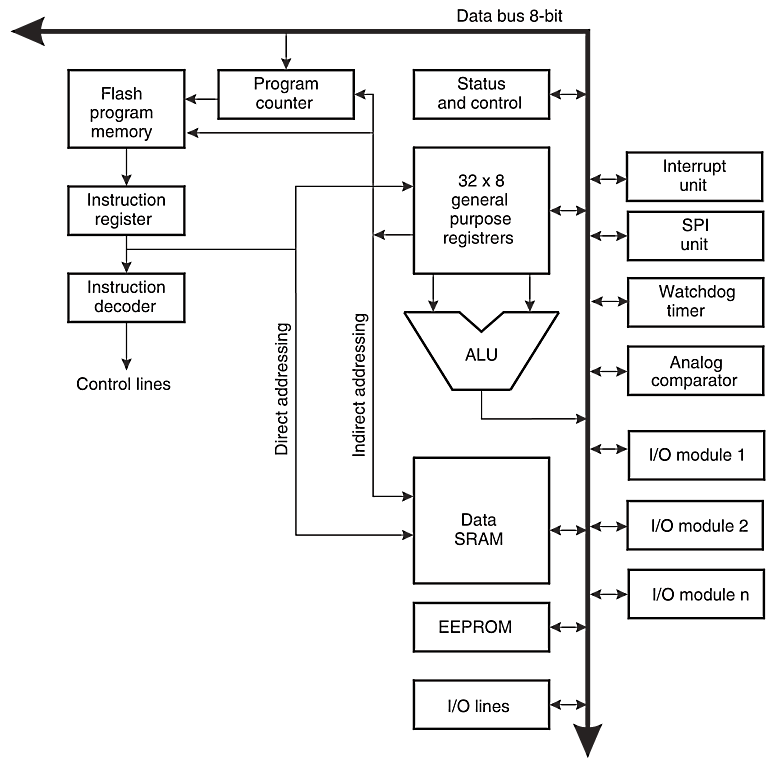
- The Arduino is controlled by a microprocessor called the AVR
General Microprocessor
Architecture (8080, 6502)
Atmel AVR Architecture
© Atmel Corporation
What's so great about the Arduino?
Arduino isn't just hardware, it's a complete development environment:
- An open-source electronics prototyping platform based on inexpensive hardware
- A free, easy to use software integrated development environment (IDE)
- A familiar programming language based on Processing and C/C++
- An active, diverse, inclusive development community
History of the Arduino
- Developed by Massimo Banzi and David Cuartielles at the
Interaction Design Institute Ivrea, Italy in 2005
- Designed to be an inexpensive prototyping system for student interactive design projects
- Built upon the Wiring Platform, by Hernando Barragán, based on the AVR and Processing
- See the full length documentary video at http://vimeo.com/18539129
Arduino Hardware Overview
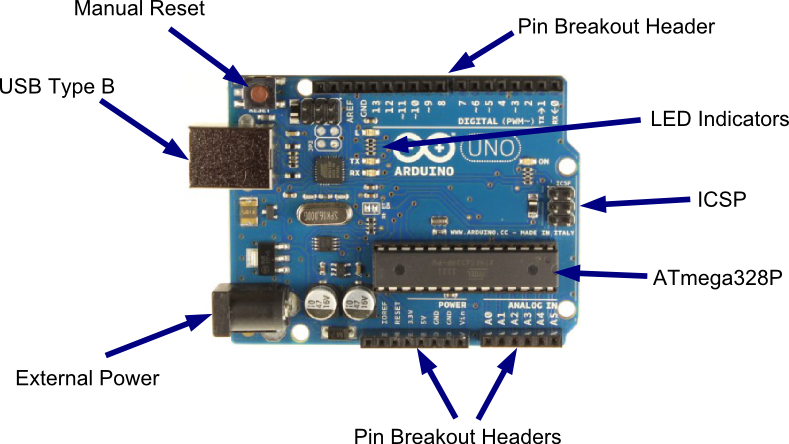
- Based on the Atmel Atmega168/328[P], an 8-bit AVR running on 5V at 16MHz
- Programmed with a bootloader to bootstrap loading programs from USB
- Microprocessor pins are broken out to headers in a standard configuration
- Additional "shield" boards can be "stacked" on the headers for extended functionality
Arduino UNO R3 (~$30)
Arduino IDE Overview
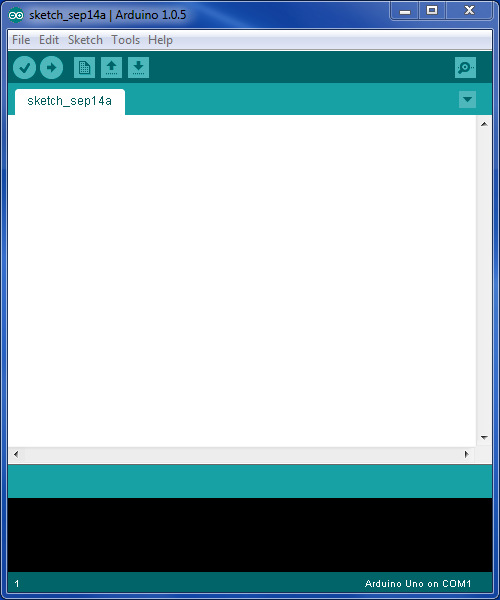
- The Arduino IDE (Integrated Development Environment) is all you need to develop programs for the Arduino
- Written in Java, based on the Wiring IDE
- Runs on Windows, OSX and Linux
- Automates the entire AVR development toolchain: editor, compiler/linker (avrgcc), uploader (avrdude), terminal emulator, and more
Arduino IDE (1.0.5)
Arduino Programming Overview
- The Arduino programming language is actually C++, written on top of the Arduino Core
- A programmer doesn't have to know how to write C++ programs, only the conventions for writing Arduino programs
- The Arduino IDE takes care of compiling, linking and uploading the program, so you don't have to know how to use any of those tools
What is the Arduino Core?
- The Arduino Core provides the main entry function, data types, and high level functions to program the AVR
- It is a library that abstracts low level microprocessor programming concepts into high level function calls
- It is based on Processing, a language designed to teach programming in a visual context to non-programmers
What is the Arduino Core?
- The Arduino Core assigns a set of standard numbers to the generic I/O pins of the microprocessor for use in programs
- The Arduino Core is automatically included in and linked to your Arduino programs
- You can extend the Arduino Core with regular C and C++ libraries
What is the Arduino Core?
A basic AVR program to blink a LED (in C):// http://hackaday.com/2010/10/25/avr-programming-02-the-hardware/
#include <avr/io.h>
#include <avr/interrupt.h>
int main(void) {
//Setup the clock
cli(); //Disable global interrupts
TCCR1B |= 1<<CS11 | 1<<CS10; //Divide by 64
OCR1A = 15624; //Count 15624 cycles for 1 second interrupt
TCCR1B |= 1<<WGM12; //Put Timer/Counter1 in CTC mode
TIMSK1 |= 1<<OCIE1A; //enable timer compare interrupt
sei(); //Enable global interrupts
DDRD |= (1<<0); //Set PortD Pin0 as an output
PORTD |= (1<<0); //Set PortD Pin0 high to turn on LED
while(1) { } //Loop forever, interrupts do the rest
}
//Interrupt Service Routine
ISR(TIMER1_COMPA_vect) {
PORTD ^= (1<<0); //Use xor to toggle the LED
}What is the Arduino Core?
A basic Arduino program to blink a LED:void setup() {
// initialize the digital pin as an output.
// Pin 13 has an LED connected on most Arduino boards:
pinMode(13, OUTPUT);
}
void loop() {
digitalWrite(13, HIGH); // set the LED on
delay(1000); // wait for a second
digitalWrite(13, LOW); // set the LED off
delay(1000); // wait for a second
}Advantages of the Arduino Core
- You don't have to write boilerplate code usually required for microprocessor programming
- Interaction with microprocessor functions is done through high level function calls rather than looking up bits to set in registers from a data sheet
- Code is readable and understandable by humans, even by non-programmers
Hands On: Blink a LED
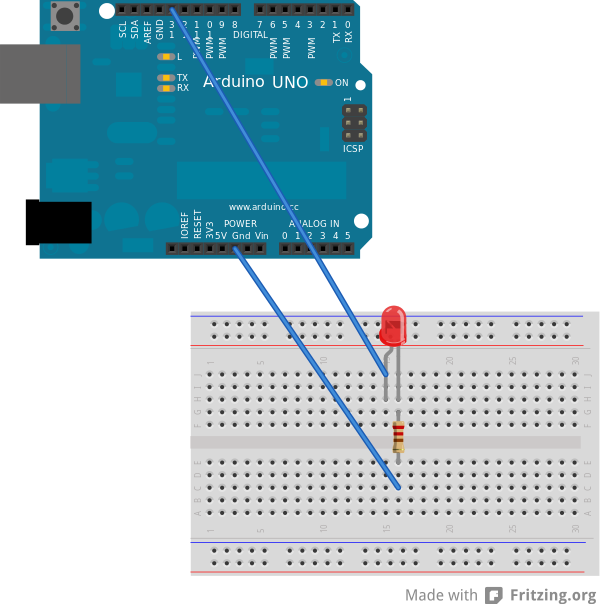
- Build an LED circuit on your breadboard to blink using the Arduino
- Connect the circuit to the headers on the Arduino board
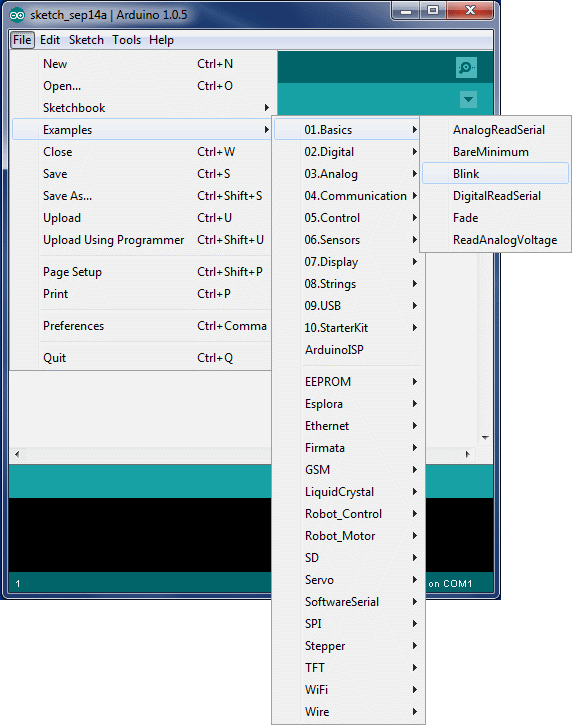
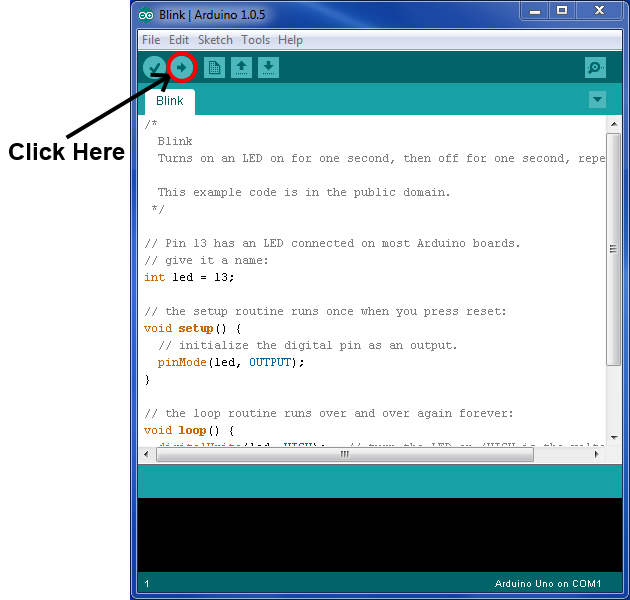
- Upload the "Blink" example sketch from the Arduino IDE
Sample LED Circuit Layout
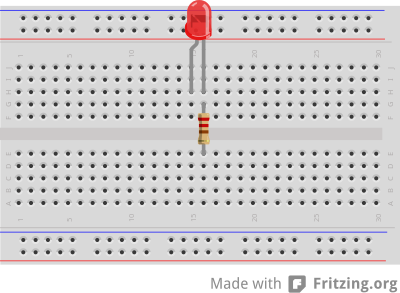 Parts Needed:
- 1 Red LED
- 1 220Ω Resistor
Connecting to the Arduino
Loading the Blink Sketch
Upoading the Blink Sketch
Conclusion
- What is a microprocessor?
- What's so great about the Arduino?
- History of the Arduino
- Overview of the Arduino hardware
- Overview of the Arduino IDE
- Overview of Arduino programming
- Hands on: Oooh, Blinky!
- Next Steps: Basic Circuit Theory
This presentation is available online at:
http://nborko.github.io/arduino101/
All source files used for this workshop are available online at:
https://github.com/nborko/arduino101
 Arduino 101
Presented by Nicholas Borko